
Gather Your Tools
You’ll need some or all of the following materials to wash your motocross bike:- Exhaust plug, one for each muffler. Alternatively, you can use duct tape.
- Air box washing cover
- Spray wash or cleaning solvent
- Chain cleaner
- Chain guard/lubricant
- Bike polish
- Mud scraper, which you will ideally use first when you’re done riding, right at the track.
- Grunge brush to clean the chain.
- Brillo pad
- Wash mitt if you prefer to wash your bike by hand.
- Microfiber rags
- Pressure washer or garden hose
- Foam sprayer
Phase 1: Prep the Bike
Put the exhaust plug into the exhaust or place a strip of duct tape over the opening to cover it completely. Repeat if you have more than one exhaust. Remove the seat. Getting water under the cover will break down the foam over time, making it too soft, and you’ll eventually have to replace it. Once the seat’s removed, take off the air filter and put on the air box wash cover. You’ll be able to spray out the area without worrying about getting water into the actual air box. At some point, either at the beginning or the end of cleaning, you’ll have to lay over your bike. There are dedicated lay-over stands for this, or you can use a basic motocross bike stand. Don’t lean the bike on the grip when you lean it onto the stand. Instead, lay it on the triple clamp to avoid damage.Phase 2: Washing the Bike
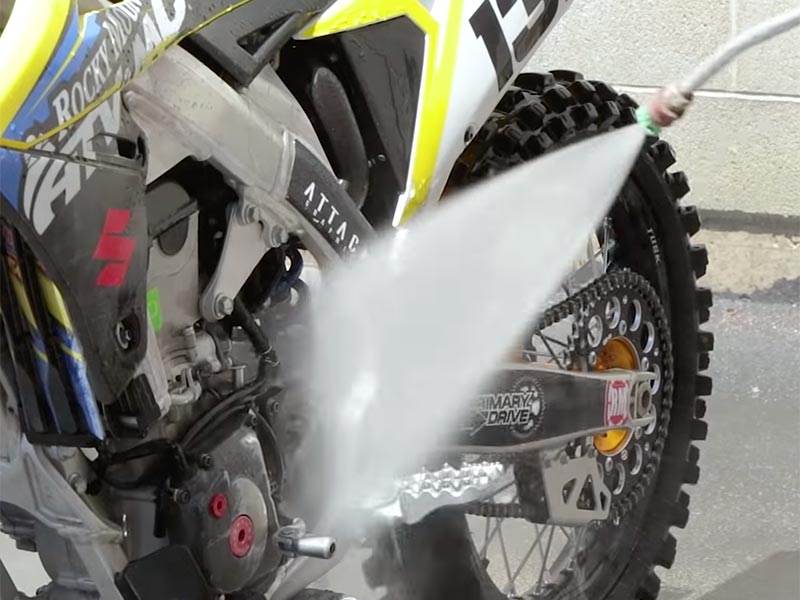
First, you’ll spray the bike to get rid of as much mud as possible, and you can also use the mud scraper at this point if needed. You can spray and/or wash underneath the bike first or last – the order you choose is solely based on preference, as pros go with either option. You’ll also want to spray and wash both sides and the air box.

Once the bike is rinsed, spray the entire bike down with the bike wash. Alternatively, you can use a foam sprayer with the cleaning solvent to spray down the bike. Then, either take the mitt and wipe everything down to get as much dirt and film off as possible or use the brush and brillo pad to get rid of the dirt and gunk. Use the chain cleaner and grunge brush to get as much grime and dirt off the chain as possible.

You may then want to spray the bike again with the solvent, letting it sit for 3 to 5 minutes before touching it up with the mitt or brush and brillo pad to get any remaining dirt off.
Pro Tip
Clay-based dirt is extra hard to get off, so you’ll want to spray everything down, let the water sit on the bike for a few minutes, then head back out to spray it again. The dirt should come off easily that way.Words of Caution
While you can use a regular garden hose, a lot of riders opt to use a low-powered pressure washer. If you have a high-powered pressure washer, or if you simply think even your low-powered one is too harsh, stand back from the bike and try to avoid the bearings, electrical components and pivot points when spraying to avoid damaging your bike. You could even peel the graphics off if your pressure washer is too intense. Also, don’t aim straight up into the seals, which can push debris farther up instead of allowing it to get washed away.Phase 3: Post-Wash Care
If you didn’t get the filter wet, you can start up the bike – while it’s running, it’ll burn off water in areas. If you did get the filter wet, though, skip this step. Use an air hose or compressed air to thoroughly dry the bike, getting water out of its nooks and crannies. Dry the forks off as best as you can. Otherwise, you can get water spots, which can cause damage to the seals. If there’s any excess water on the bike, wipe it off using the microfibre rags. Once the bike is dry, put the air filter back in, take the exhaust plugs out and install the seat. Next, lubricate the chain and joints. This is an important step post-wash because if water remains on the chain, it can rust. Lube on the bottom to avoid getting excess spray on the swingarm and wheel, and roll the tire forward as you do. Make sure to get the moving parts that need the most attention, like the kickstarter and foot pegs.

Spray down the bike with bike polish, then polish it up to make it shiny. Make sure to spray under the mud guards – by coating them, you’ll keep mud from sticking.